Awhile ago, I saw this really nifty pin showing how to transfer a photo onto wood. I thought there was no way it could possibly work, so I had to give it a try.
 |
| This is the photo that made the rounds. Photo via pinterest, and I can't find the original source again... It was a video, I think. |
For this project, I printed two photos off at work (shhh...), one in black and white and one in color. I wasn't sure if the color would work, so I wanted to try. The copier at work is a laser printer, which is vital; ink jet printed pictures won't work. And they were printed on regular old copy paper.
 |
| The black and white photo. Personal photo of a personal photo. |
 |
| And the color photo (I chose a reddish photo, with lots of orange and warm colors. This turned out to be a good thing). Personal photo of a personal photo. |
Then I aquired a piece of wood (a board that was about 8.5 inches wide, and long enough for at least both photos to fit. I went to the craft store and got the Gel Medium that is called for, as well as mod podge to seal, a new foam brush to apply stuff, annnnd... I think that was it! Not too much stuff needed.
After getting my supplies, the first step was to apply the gel medium to the board.
 |
| Gel medium, board. Personal photo. |
I applied a layer not too thick but enough to cover pretty well, and as even as possible. Once it was covered with gel medium, I carefully laid the photos face down onto the board, and smoothed out the surface as much as possible. No bubbles!
 |
| I fit both pictures onto the same board. The intention was to cut them apart later, so I picked the best looking spots. Personal Photo |
 |
| A closer shot. The photo slightly overlapped the edges of the board, but that was totally fine. Personal photo. |
Then I let them dry overnight.
The next step was a little scary - unearthing the pictures! I got the paper wet, and then used my fingers to rub off the paper. Don't rub too hard, or the picture might come off! And if you don't rub hard enough, the paper won't come off. So be careful!
 |
| Carefully rubbing off the paper from the color photo... Personal Photo |
 |
| Getting the first layer off the black and white photo! Personal Photo |
After a lot of rubbing, the pictures are uncovered!
 |
| Both pictures! Personal Photo |
 |
| Black and white! Looks pretty rustic. Personal Photo |
 |
| I must have rubbed too hard on the edges, but kind of like the effect! Personal Photo |
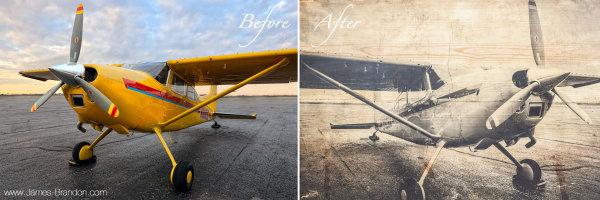
IT WORKED! I added a thick layer of mod podge to seal it, and now just have to cut them apart to hang on the wall!
As you can see, both the black and white and color photos turned out pretty well! I lucked out by picking a color photo that matched well with the yellow-ish color of the wood. If I had blues or other cooler colors, it would have probably looked a little weird on top of the wood color. But the sunset fit the look perfectly! I also had a couple issues with rubbing off the photo, one of the worst spots was Dino's face in the black and white picture. I think that coloring it in with light pencil might help, but I just left it and decided it looked just fine and rustic.
Overall, it wasn't too expensive of a project, the gel medium was the most expensive part at about $10. But now I have tons, and can do this project over and over!
Have you tried this project? Who has some sort of table saw I can borrow to cut the pictures apart?

No comments:
Post a Comment